Whether you’re organizing a birthday bash, a bachelor or bachelorette party, or just a fun night out in the city, a party bus sets the tone for an unforgettable event. In a city like Toronto, where nightlife and entertainment thrive, renting a party bus has become the go-to option for creating high-energy, mobile celebrations. Let’s explore the best Toronto Party Bus Rental services, what they offer, and how to choose the perfect ride for your special occasion.
Why Choose a Party Bus for Your Celebration?
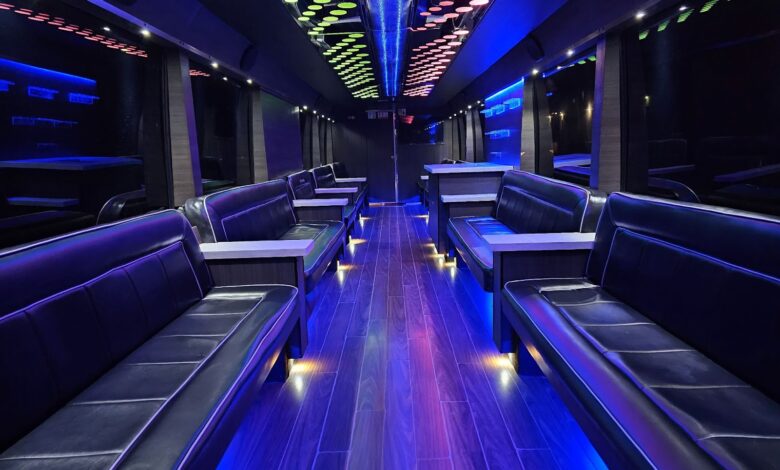
You get to enjoy a nightclub atmosphere with LED lighting, high-quality sound systems, dance floors, and even on-board bars while moving through the city.
Moreover, with professional chauffeurs at the wheel, your group can focus on having fun without worrying about directions or safety. A Toronto Party Bus Rental ensures your event stays stylish, safe, and stress-free.
Events Perfect for a Party Bus Experience
Party buses are incredibly versatile and can be booked for a wide variety of events. Some of the most popular occasions include:
- Weddings: Transport your bridal party in style from the ceremony to the reception.
- Prom Nights: A safe and glamorous way for teens to celebrate this milestone event.
- Birthdays: Add a fun twist to birthday parties with music, drinks, and dancing on the go.
- Corporate Events: Impress clients or treat your team with a unique mobile party experience.
- Concerts & Sporting Events: Pre game with friends and skip the hassle of parking.
With a trusted Toronto Party Bus Rental, any of these events can be elevated to a whole new level of entertainment and excitement.
Key Features to Look for in a Party Bus
Not all party buses are created equal, so it’s essential to consider the features that matter most to your group. Here are some features to look for:
- Capacity: Choose a bus that comfortably fits your guest list.
- Sound & Lighting: LED lighting, surround sound, and flat-screen TVs create the party vibe.
- Bar Facilities: Many buses come with built-in bars stocked with non-alcoholic drinks or allow BYOB options.
- Comfort: Leather seating, air conditioning, and spacious interiors are a must.
- Cleanliness & Maintenance: Check reviews and ask for recent photos or inspections.
When choosing a Toronto Party Bus Rental, it’s smart to visit the company or inspect the vehicle beforehand to ensure it matches your expectations.
How to Book the Right Party Bus in Toronto
- Book in Advance: Especially during peak seasons (summer, holidays, graduation months), party buses get booked quickly.
- Compare Packages: Look at different service providers to compare what’s included in their packages and what might incur additional fees.
- Read Reviews: Online reviews and testimonials can give you insight into the company’s service quality.
- Clarify Policies: Understand their rules on alcohol, cancellation, timing, and potential overtime charges.
Most reputable Toronto Party Bus Rental companies offer online booking systems and dedicated customer support to walk you through the process.
Make the Most of Your Party Bus Experience
Once your booking is confirmed, all that’s left is to enjoy the ride. Here are a few tips to ensure you make the most of your party bus experience:
- Create a Playlist: Set the mood with your favorite tunes.
- Plan the Route: Some companies let you customize the route—hit your favorite spots in Toronto.
- Bring Snacks & Drinks: Light refreshments keep the energy up without the need for stops.
- Capture the Moments: Don’t forget to take pictures and videos to remember your night.
- Be Responsible: Always assign a point of contact and follow safety guidelines, especially if alcohol is involved.
With the right preparation and a top-notch Toronto Party Bus Rental, your next event can go from ordinary to unforgettable in no time. From sleek interiors to customizable features, the top Toronto Party Bus Rental services ensure your special day or night is one to remember.